In our library, the computers are in small study carrels, with barely enough room for the mouse and mouse pad next to the keyboard. When students are working on projects, they don't have any room to put down a piece of paper and write. So, I bought a bunch of clipboards at the office supply store.

These are really appealing, right? NO! They are functional, but I wanted to make them a little bit more fun. So, our great music teacher showed me how to decoupage them.

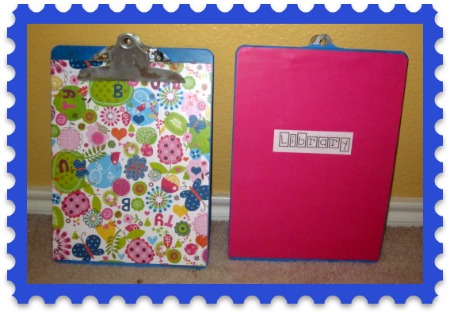
Now I'll show you how to do this library clipboard project step by step. First, I need to tell you that there are at least two types of clipboard. Do you see how the clip at the top is a different shape? Either will work, but the difference at the top means that you will have to adjust your construction methods.

Here are the supplies you'll need:
- 12" by 12" scrapbook paper (This should be heavy paper or cardstock. If your paper is as thin as printer paper, it will bubble up when you put Mod Podge on it, and it'll make you crazy trying to smooth it out!)
- Mod Podge (purchased or make your own with 50% white glue and 50% water, well shaken)
- foam brushes
- spray acrylic sealer
- acrylic paint, in a color to match your scrapbook paper
- "LIBRARY" in die cut letters or printed in cute font, to identify your clipboards in case they wander away
- plastic ruler or old credit card for smoothing out bumps and bubbles

STEP ONE: Paint around the outside edges of the clipboard with acrylic paint, using your foam brush. These edges will not be covered with paper, and we don't want that ugly brown to show up in our finished product. If you have the type of clipboard with the huge metal clip, shown above on the right, paint about an inch down from the top of the front, too. It is quite a challenge to cut the paper to fit around this huge clip--much easier to paint!

STEP TWO: Cut the scrapbook paper to fit your board. For my boards with the big metal clip, I cut the piece for the front 8 7/8" wide and 11 1/4" long. The piece of paper for the back is 8 7/8" wide by 12" long. I used some of the scraps to add a contrast stripe on the back, just for fun.

STEP THREE: Apply a light coat of Mod Podge, using your foam brush, to the front of the clipboard. DON'T PAINT THE MOD PODGE ON THE PAPER! If you do, the paper will get really wet and bubble up. Put the paper onto the Mod Podged clipboard, and smooth it out with a plastic ruler. Let the front dry.
STEP FOUR: Repeat this process for the back of the clipboard. Apply a light coat of Mod Podge TO THE CLIPBOARD with your foam brush. Place the paper on the board, and smooth out the bubbles with a plastic ruler. Let dry.
STEP FIVE: Use another light coat of Mod Podge to cover the front of the clipboard, on top of the paper. This adds shine and protection to your paper. Let this coat dry.
STEP SIX: You know what's coming next, right? Repeat step five on the back of the clipboard, coating the top of the paper. I printed out the word "LIBRARY" in one of my scrapbook fonts and added this to the back of the clipboard, before I applied this top coat. You could also use die-cut letters. Let dry.
STEPS SEVEN AND EIGHT: Spray the front, then back of each clipboard with a light coat of acrylic sealer. Let the front dry, of course, before you spray the back.
TA-DA! Now you have colorful clipboards, ready for the next research project in your school library! Don't these look MUCH better than those ugly brown ones we started with?
Would a Video Help?
This video shows you the steps (in fast motion) with a few minor differences. She cuts the paper out with an Exacto knife around the edges, instead of using a paper cutter. And she uses her hands to smooth out the bubbles, instead of a ruler.
In this YouTube video, a Mom made a clipboard for a music teacher using old sheet music instead of scrapbook paper. That makes me think that you could also use some of the pages from old books you are discarding. She also put a cute quote on the back, instead of just the word "library." She unscrewed the clip, instead of painting around it. I didn't think of that, but it sounds like a lot more work, especially if you are doing a class set.
Where do you get the fonts and borders for your signs?
ReplyDelete